VAWA
The home of amateur winemaking in Vancouver
Acid Control in Winemaking, Part Two:
Reducing Acid with Malolactic Fermentation (or MLF)
1998
A "purist" once pointed out to me that before inducing a malolactic fermentation, I should think about the fact that malic acid is part of the grape. Lactic acid is not - rather it is a product of bacterial action and thus a contaminant. I resisted the urge to retort that alcohol is not part of the grape either. So - enough philosophy and on to practicalities.
The two main acids found in grapes are tartaric and malic. Of the two, malic has a more aggressive acid effect on the palate. Lactic acid, the product of malolactic fermentation is less "sour" than either. During malolactic fermentation (MLF), malic acid is converted into lactic acid and carbon dioxide (CO2): 1 gram (g.) of malic acid will be converted into 0.7 g. of lactic plus 0.3 g. of CO2. Thus the effect on the acidity is to produce a less aggressive acid and a smaller quantity of it. MLF will also increase the complexity of a wine. The flavour becomes more mellow, the nose more complex and vinous.
To have an MLF occur is desirable in many red wines and in some whites, such as Chardonnay or Sauvignon Blanc. MLF should probably be avoided in wines whose appeal is their fresh fruity characteristic such as Riesling or Gewürztraminer. If you are aiming for a crisp fruity Sauvignon Blanc or Chardonnay, MLF should be avoided here as well. A compromise, a partial MLF is possible but a bit tricky for the hand-winemaker- we’ll talk about it later, along with how to avoid MLF altogether.
Inducing MLF
If you want to get an MLF going in a wine, the first thing to do is to get a culture of ML bacteria. One product available on the market is a blend of cultures of the bacterium leuconostoc oenos. It comes in liquid form in a 114 mL packet, and should be stored under refrigeration. The instructions say the packet is sufficient for 5 gallons of wine. You may have more than that and will need to increase the amount of culture.
The ML bacteria do best in warm temperatures, under higher pH conditions and an absence of SO2. Since conditions ideal for the MLF conflict with those for the wine itself, compromises are necessary. The bacteria will still work at pH levels down to 3.0 or so, but more slowly. The same is true of temperatures down to about 13°C.
Free SO2 levels should be at a maximum of 15 ppm. If you are going to sulphite the must before adding yeast, try to keep the SO2 under about 25-ppm if possible. After the alcohol fermentation is well underway, much of the free SO2 will have gone. This is a good time to add the ML culture. This is particularly true of red wines where you are probably going to take the fermentation temperature up quite high.
Usually white wines you are going to do an MLF on will be low pH, and will thus will have needed much less SO2 to begin with.
Depending on conditions then, an MLF could take as short a time as a couple of weeks, or as much as several months. Back in the pre-scientific days, winemakers noticed that wines "came alive" again in the spring following their harvest and initial fermentation. This would undoubtedly have been due to MLF caused by naturally present bacteria, combined with the warming temperatures.
If you are using a barrel and you have just taken out a wine that has completed MLF, the new wine you replace it with will almost certainly do an MLF if it hasn't done so earlier.
Tracking MLF with the Paper Chromatography Test
Just as you need a hydrometer to track the progress of your alcohol fermentation, so you need a means of checking on the progress of an MLF. This is paper chromatography and it’s rather more complicated than taking a hydrometer reading. You need either to put together a paper chromatography kit, or to purchase one from your winemaking supplier. I’ll tell you about making or refreshing the solvent at the end of this article.
There are two "chromatograms" illustrations. You should refer to them as you read how to set one up.
First, draw a line with a pencil (don't us a pen, ink will run and ruin things) about 2 cm above the bottom edge of the long side of the special paper included in the kit. Pencil six or seven "X’s" equally spaced along the line and label each with the name of the samples to be tested. Add the date of the tests.
Fold a couple of sheets of ordinary typing paper into roughly 2-cm pleats accordion style. Lay the chromatography paper on one of these and use the other to hold the capillary tubes. Fill a capillary for each of the samples to be tested by dipping it in the liquid until it rises pretty well to the top of the tube. Touch the end of each tube briefly to the "X" mark it belongs to. Make sure the wet patch formed is a maximum 1-centimeter across. Let the patches dry then re-apply the capillaries. Continue this process until the capillaries are empty. In this way you create a concentrated patch for each sample. When the spots are dry following the final application, staple the short sides of the chromatography paper together to form a cylinder. Handle the paper by the edges - acidic fingerprints could interfere.
Pour about a centimeter of the yellow chromatography solvent into the bottom of the jar supplied (about 100 mL). Lower the cylinder of chromatography paper, "X" marks downwards, into the jar, and seal it.
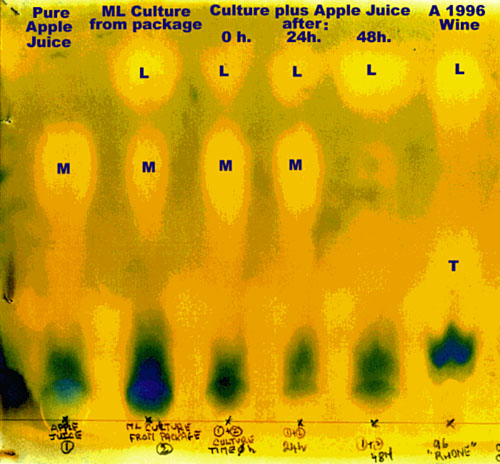
It will take about 8 hours for the solvent to get near the top of the paper. As the chromatography solvent makes its way up, it carries the various acids with it. The lactic acid, marked L on the pictures, moves the furthest. Second furthest, marked M, is the malic acid. Tartaric acid moves the least of all and is marked with a T. When the solvent is close to the top (don’t let it go past), take the cylinder out and put it upright on a piece of paper towel somewhere well ventilated to dry. It will take a day or even more for the colours to completely develop, depending on temperature and air circulation. When it is done, you will see yellow patches representing the acids against a greenish background.
Follow the progress of a culture illustrated by the first illustration: The first sample is from a 1-litre package of apple juice. Make sure there are no preservatives such as sodium benzoate. Vitamin C is okay. You can see from the chromatogram that the main acid component of the apple juice is malic. The second sample is directly from the packet of culture. This shows a high proportion of lactic acid at the top, with some malic still left.
Mix the culture and apple juice in a 2 or 3 liter bottle under as sterile conditions as you can. Sample 3 was taken from such a mix immediately after it was made. Cover the bottleneck with cellophane wrap and a rubber band, to keep dust and insects out, but also to allow CO2 to escape. Place it in a warm spot where the temperature will be around 25°C. Sample 4 shows that after 24 hours some of the malic acid of the apple juice has turned to lactic, but not much. Sample 5 shows that after 48 hours all the malic acid has been converted to lactic and the culture is ready.
Sample 6 is of a wine that has completed its MLF. It is shown to indicate where the tartaric acid, which is not present in the ML culture shows up.
It is interesting to note that there is a faint indication of acid below the malic position in samples 1, 3, 4 & 5 that does not appear in sample 2. This could be due to the vitamin C (ascorbic acid) or others appearing as traces in the apple juice. If you had added citric acid (possibly in an acid blend) it would also show up between the tartaric and malic spots.
Now let's look at the second illustration, the one with samples from six different wines.
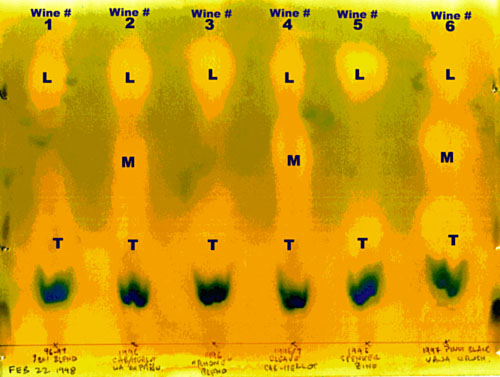
The main feature is that samples 1, 3 and 5 have completed MLF, while samples 2, 4 and 6 have not. Of those uncompleted, #2 is furthest along with #6 the least.
There is other information to be gleaned, although a person has to be a bit careful not to over interpret.
The tartaric spot on 4 is weak. This is a B.C. red wine. There is a possibility of a very high proportion of the acid being malic. In this sort of situation, you need to keep a close eye on the pH and TA. If the acid was in balance before the ML started, a complete MLF could leave the wine short of acid. By the same token, if a wine were heavy on the tartaric with little malic showing, an MLF wouldn’t have much effect.
If the spotting was carefully controlled, that is to say, each capillary equally filled and each spot the same diameter, then wine #6 has more tartaric than the others, and even though ML has started, it looks like more malic was present at the start, as well. In fact sample #6 is a 1996 B.C. Pinot Blanc with a relatively high TA.
Wine # 5, a 1996 Spenker Ranch Zinfandel is interesting for the tight definition of the tartaric and lactic patches and the lack of indications of the presence any other (minor) acids.
Avoiding Malolactic Fermentations
If you want to avoid having an MLF occur, prompt racking off fermentation solids helps, but most important is maintaining adequate SO2 levels. Generally this means a concentration of molecular SO2 of at least 0.8-ppm. The amount of free SO2 to achieve this depends on pH, for instance a minimum of 30 ppm free SO2 at pH 3.3, 40 ppm at pH 3.4. Since some of the SO2 you add immediately becomes bound you need to check to see if you have enough SO2 left in the free state.
Disaster can strike a sweet wine stabilized with potassium sorbate. If SO2 levels are too low and MLF occurs under these conditions, a revolting geranium like smell and flavour develops and the wine has to be dumped.
Partial MLF
Suppose you wish to have a Chardonnay that has some complexity, but that also retains a lot of crisp fruity character. A partial MLF is the answer. You can’t partially ferment your whole batch. What you have to do is a complete MLF on a portion of the wine, no MLF on the rest, and subsequently blend. The problem here is preventing the MLF portion from getting the non-MLF portion started. Commercially, this is achieved by sterile filtering the ML bacteria out. This is difficult for the home winemaker. However, if good filtration is done and, most importantly, the molecular SO2 level is kept at a minimum of 0.8 ppm a blend of MLF and non MLF portions should remain stable.
Some notes on your malolactic chromatography kit
The paper is Whatmans #1 Chromatography paper.
The solvent is made as follows: Thoroughly shake together in a 250 mL separatory funnel, 100 mL distilled water, 100 mL n-butanol, 11 mL glacial (concentrated and very nasty stuff to handle*) formic acid and enough bromcresol green indicator (about 0.15 grams) to give a deep yellow colour. Allow to settle. Drain off and discard the bottom, water-soluble portion and you will be left with about 100 mL solvent.
*If you are not trained in working with hazardous chemicals, don't even think of working with glacial formic acid yourself. Get someone competent to do it for you.
The solvent can be used several times over a period of two or three months. However, it eventually wears out and the patches from the different acids begin to run into each other. However, don't throw your tired solvent out. You can rejuvenate it by adding n-butanol to bring the volume back to 100 mL, a tad of bromcresol green if necessary for good colour, 100 mL distilled water, 11 mL glacial formic acid, and going through the mixing and separating process all over again.
It is even possible to get away without having capillary tubes for spotting. Use toothpicks.